


Jared has an extremely loose tooth and a girlfriend of mine asked him if he had a tooth pillow for his tooth. He looked at her and said "No" after thinking a moment and she just smiled. I got to brainstorming, though....... So, I designed this simple tooth fairy pillow, using mainly scraps.

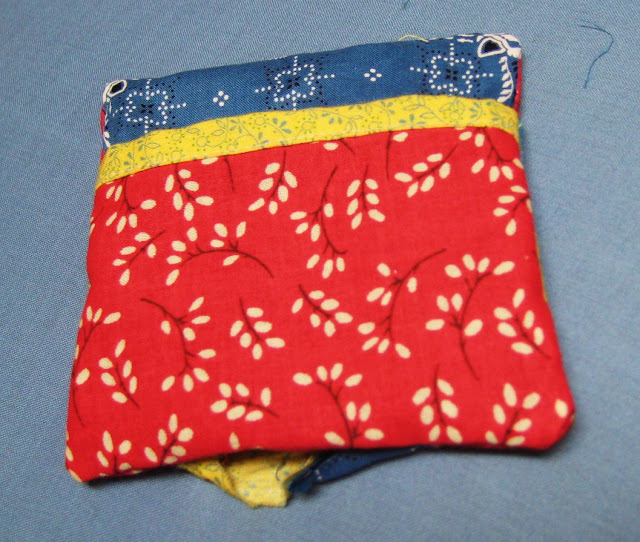
I cut out 16 - 1.5" squares for the top patchwork. The finished top will ultimately be 4" and the patches 1" each, given a quarter inch seam allowance. The (blue) back piece is a 4.5" square. The (red) pocket is 3.5" x 4.5". Lastly, the (yellow) binding for the pocket edge is 1.5" x 4.5".

As with all patchwork, I put all of my mini-patches together by sewing them into 4 strips, pressing seams, sewing the strips together, and pressing once again.

I then folded the binding in half and again in quarters in on itself, so as to make a hem/binding. I matched it to the edge of the pocket fabric and scantly sewed across. Then, I placed the (red) pocket on the (blue) back fabric, all facing the right way. I scantly sewed around the perimeter of the pocket on the 3 sides. Once the back was compete, in addition to the front of the project, I placed both pieces right side facing each other. I sewed around the edges, leaving a spot to flip it right side out and stuff it. I trimmed the corners and flipped it.
I stuffed it, hand sewed the opening shut using a blind stitch (you could use any stitch), and threaded some embroidery thread through the center several times to depress the center of the pillow down. I thought this would make a perfect little perch for a tooth.

So, I decided the back, or bottom, of the pillow should have a pocket because it is a perfect spot to have the tooth fairy stick a little bit of money or teeny surprise. When Jared loses his tooth, within the next couple days I am sure, he can place his tooth on the pillow's little patchwork perch on a table by his bed. The next morning he can wake up to an empty pillow...a sure sign she's been there..... and he can flip it over and peek inside the pocket to see what he received as payment for his tooth.

So, there you have it... the relaxed version of a tooth fairy pillow tutorial. Any questions or needed clarifications, feel free to comment or email me. Just enjoy the use of small scraps and instant gratification when making this easy little gift. I know that I did.... ;)


I cut out 16 - 1.5" squares for the top patchwork. The finished top will ultimately be 4" and the patches 1" each, given a quarter inch seam allowance. The (blue) back piece is a 4.5" square. The (red) pocket is 3.5" x 4.5". Lastly, the (yellow) binding for the pocket edge is 1.5" x 4.5".

As with all patchwork, I put all of my mini-patches together by sewing them into 4 strips, pressing seams, sewing the strips together, and pressing once again.

I then folded the binding in half and again in quarters in on itself, so as to make a hem/binding. I matched it to the edge of the pocket fabric and scantly sewed across. Then, I placed the (red) pocket on the (blue) back fabric, all facing the right way. I scantly sewed around the perimeter of the pocket on the 3 sides. Once the back was compete, in addition to the front of the project, I placed both pieces right side facing each other. I sewed around the edges, leaving a spot to flip it right side out and stuff it. I trimmed the corners and flipped it.

I stuffed it, hand sewed the opening shut using a blind stitch (you could use any stitch), and threaded some embroidery thread through the center several times to depress the center of the pillow down. I thought this would make a perfect little perch for a tooth.

So, I decided the back, or bottom, of the pillow should have a pocket because it is a perfect spot to have the tooth fairy stick a little bit of money or teeny surprise. When Jared loses his tooth, within the next couple days I am sure, he can place his tooth on the pillow's little patchwork perch on a table by his bed. The next morning he can wake up to an empty pillow...a sure sign she's been there..... and he can flip it over and peek inside the pocket to see what he received as payment for his tooth.

So, there you have it... the relaxed version of a tooth fairy pillow tutorial. Any questions or needed clarifications, feel free to comment or email me. Just enjoy the use of small scraps and instant gratification when making this easy little gift. I know that I did.... ;)

~~~~~~~~~~~~~~~~~~~~~~~~~~~~~~~~~~~~~~~~~~~~~~`


He lost the tooth first thing this morning. His other top front tooth is pretty loose, as well, but I think this one will take a week or so to come out. :)
ReplyDelete