Thursday, September 29, 2011

How Shall I Arrange Lucy's Triangles?

       I am nearly done with Liv's baby quilt, having only to hand sew the backside of the binding. Also, I have to go back and finish Lucy's baby quilt. Now, I was having "sew" much fun making baby quilts for baby girls, I decided to make a second one for Lucy, using the same fabric as I used on Liv's quilt. All patches are made, but I have one small problem. I need to figure out how to arrange them. Here are a few ideas below. Let me know what you think I should do.

A Consistent Pattern Throughout of Green and Pink.

Pink and Green Diamonds.

Diagonal Stripes of Pink and Green.

Pinwheel-Style.

Pink and Green Zigzags.

There are so many more possibilities, too. Who knew triangles would lead to being so stumped. ;)

PS ~ Jenna, your opinion on the quilt is mandatory. :p

~~~~~~~~~~~~~~~~~~~~~~~~~~~~~~~~~~~~~~~~~~~~~~

~ Autumnal Equinox ~

Celebrating the Autumnal Equinox is super fun. I love the smell of approaching rain, the kite-worthy afternoons, the occasional gray skies, the cooling air, the harvest, the food possibilities, and most of all, the colors. It has taken me nearly a week now to share with you a glimpse of our celebration, but here it is.
 The boys and I sang some Autumn related songs at circle time and did a brief Autumn meditation to welcome the changing of the season and to renew ourselves, for the equinox is a time of new beginnings.


I was going to have Jared do this project, but it was more tedious than I had originally thought, so I decided to make these Autumn leaf spirits, inspired by the Magic Onion. I cut out leaves from wool felt, sewed on wooden beads with thread, glued wool roving for hair and acorn hats for fairy caps, and when dry, I hung them up with wool yarn.


Dylan and Jared painted some wet on wet watercolors, exploring the varying shades created when using red and yellow. Dylan's painting became the leaves for Jared's thankful tree below.

With my help, Dylan was able to gather and design this Autumn mobile above the boys' nature table.

And here is the nature table, set up by Jared who wanted to ensure a degree of symmetry. The corn on the table is Red Murieta corn from our garden. And below the table is a book basket, also inspired by the Magic Onions. We gathered our favorite fall time stories and placed them in this basket. Included are:

Autumn   by Gerda Muller
Woody, Hazel, and Little Pip   by Elsa Beskow
Around the Year   by Elsa Beskow
Christopher's Harvest Time   by Elsa Beskow
Thunder Cake   by Patricia Polacco
Mother Earth and Her Children   by Sibylle Von Olfers
In the Woods   by Cristini and Puricelli
Oh What A Thanksgiving   by Steven Kroll
The Ghost-Eye Tree   by Martin and Archambault
The Changing Seasons   Grange Books

Homemade play dough play is a necessity in autumn colors, of course.

Jared was working on his calendar. He was focusing on festivals primarily at the end of September through the beginning of December.

Jared's Thankful Tree. He painted the sky with red and yellow, and the earth with blue and yellow, then placed all the finished leaves of thankfulness in their place on the branches. He said he didn't want any of the thankful leaves to have fallen to the ground, hence their sole placement in the tree. My favorite are the little leaves that symbolize our values. He did a fantastic job!

Carrots from the garden! Oh, I love the harvest!

Corn! We yielded corn!!!! I am so trying again next year, even though they aren't that large, I still cannot believe we were actually able to harvest corn from our backyard!

And, surely, we had to bake some harvest bread with sunflower and poppy seeds. We love baking bread around here. :)

So, how was your transition into the harvest season? .......or the spring season, for those of you in the southern hemisphere. Did you let it pass you by without notice, or have you looked around and noticed subtle changes? Enjoy the sights, sounds, smells, and tastes of the season. Have a fantastic Autumn!!

~~~~~~~~~~~~~~~~~~~~~~~~~~~~~~~~~~~~~~~~~~~

Sunday, September 25, 2011

Autumn Quilt

I have finally finished our Autumn quilt from last year! This was my second quilt ever, though you wouldn't know it because it only took a year to finally get to it and finish. I completed the binding last night, just in time to initiate Autumn. This was made from various fabrics on hand from the thrift store, a vintage pillow case, vintage sheets, and a set of cloth napkins. Pretty eclectic and resourceful, I suppose. Either way, I am really happy with how it turned out, even with lazy 12" patches. :)


~~~~~~~~~~~~~~~~~~~~~~~~~~~~~~~~~~~~~~~~~~~~~~~~

Wednesday, September 14, 2011

Starry Night At Home Quilt ~ Part 2

Okay, now I have completed the remaining 3 blocks! Now for perhaps some black sashing. Hmmm...let me dig through my stash and see if I even have black fabric.


This project, is super easy to design and implement. I love it!

~~~~~~~~~~~~~~~~~~~~~~

Starry Night At Home Quilt ~ Part 1

When finished, this small quilt will be hung in the boys' room and should measure just under 30" on all sides. There are 4 blocks, one of which is complete, and 3 of which are cut and ready for sewing. When I am done with all 4 blocks, I will make the sashing, sew it all together, create a backing and the binding, hand quilt the wall decoration, and finish off the binding. This project is super fun!! 


~~~~~~~~~~~~~~~~~~~~~~~~~~~~~~~~~~~~~~~~

Tuesday, September 13, 2011

Celebration and Organization

'Twas yet another thrifty birthday for our blooming 12-year-old! We had a blast in the total simplicity of the day. Actually, much of the weekend, Luke was helping his Dad with the firewood for the approaching winter, which he found to be very fulfilling. He enjoyed laboring for his birthday...hahaha!


I made the above sign the night before, and apparently I was having difficulty figuring out how many index cards I would be needing... It was late.......  Below, I prepared chocolate pancakes with fresh strawberries, blueberries, and whipped cream. He wasn't expecting that. :)

A gift, card, and envelope made by Jared.


Yum!

He really appreciated the mosaic picture frame from his brother. Yay for the dollar store and a little imagination!


This photo turned out pretty darn good considering it was super early in the morning and they had a touch of bedhead.

This weekend, I also reorganized a few areas in the house. I finally returned Daniel's desk space to him. The shelf was covered in knitting and sewing stuff before.

Out where the craft corner was, I transformed it into a simple open office space, as it should have been a while back.

I took the other desk/table into the bedroom where the two big bookshelves were before I put them into the living room. This table sits next to my small dresser. This is now my sewing/craft table. I absolutely love it!!!!!


Over where my dresser previously sat, is now the wooden cart originally from the kitchen. It is great for extra nearby shelving.

Today, I was able to use my sewing table for the first time. I made the binding for 3 different quilts! The turquoise binding will be for the 36 Patch Quilt (I couldn't wait any longer for Amanda Jean's example, so I decided on my own finishing touches), the brown floral will be for the Autumn quilt I made last year, and the pink is for Liv's baby quilt, shown on my table above. 


Tuesday, September 06, 2011

Tooth Fairy Patchwork Pillow

Jared has an extremely loose tooth and a girlfriend of mine asked him if he had a tooth pillow for his tooth. He looked at her and said "No" after thinking a moment and she just smiled. I got to brainstorming, though....... So, I designed this simple tooth fairy pillow, using mainly scraps.


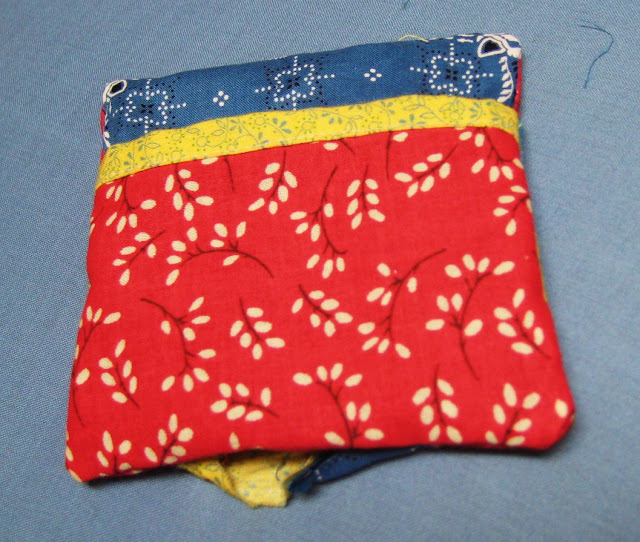
I cut out 16 - 1.5" squares for the top patchwork. The finished top will ultimately be 4" and the patches 1" each, given a quarter inch seam allowance. The (blue) back piece is a 4.5" square. The (red) pocket is 3.5" x 4.5". Lastly, the (yellow) binding for the pocket edge is 1.5" x 4.5".


As with all patchwork, I put all of my mini-patches together by sewing them into 4 strips, pressing seams, sewing the strips together, and pressing once again.


I then folded the binding in half and again in quarters in on itself, so as to make a hem/binding. I matched it to the edge of the pocket fabric and scantly sewed across. Then, I placed the (red) pocket on the (blue) back fabric, all facing the right way. I scantly sewed around the perimeter of the pocket on the 3 sides. Once the back was compete, in addition to the front of the project, I placed both pieces right side facing each other. I sewed around the edges, leaving a spot to flip it right side out and stuff it. I trimmed the corners and flipped it.


I stuffed it, hand sewed the opening shut using a blind stitch (you could use any stitch), and threaded some embroidery thread through the center several times to depress the center of the pillow down. I thought this would make a perfect little perch for a tooth.


So, I decided the back, or bottom, of the pillow should have a pocket because it is a perfect spot to have the tooth fairy stick a little bit of money or teeny surprise. When Jared loses his tooth, within the next couple days I am sure, he can place his tooth on the pillow's little patchwork perch on a table by his bed. The next morning he can wake up to an empty pillow...a sure sign she's been there..... and he can flip it over and peek inside the pocket to see what he received as payment for his tooth.


So, there you have it... the relaxed version of a tooth fairy pillow tutorial. Any questions or needed clarifications, feel free to comment or email me. Just enjoy the use of small scraps and instant gratification when making this easy little gift. I know that I did....  ;)


~~~~~~~~~~~~~~~~~~~~~~~~~~~~~~~~~~~~~~~~~~~~~~`


Sunday, September 04, 2011

Wisteria


Wonderous wisteria ~ knotted dormant branches in winter; full, woven feathery soft symbol of life and growth in spring and through summer. I was standing on the back deck this morning and noticed how lovely the wisteria was looking and how much growth there has been since last year. After taking a few shots, I decided to share this random collection with you.